I was so excited to get my A7S iii in hand, but the menu settings confused the hell out of me. I wrote this post to both remember what I did and to help others who were as confused as I was.
I’ll walk you through each setting I changed, starting at the top of the menu and letting you know what it was I changed and why I changed it.
Side Note: You can skip all this and simply download my settings if that’s easier.
1) Change The File Format to H.265
Menu -> Shooting -> Image Quality -> File Format -> XAVC HS 4k
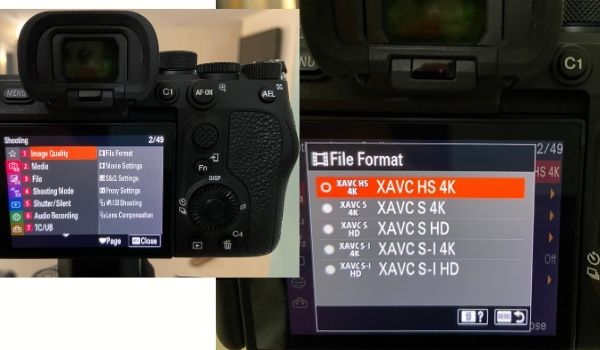
What this does is sets the file you’re recording to the new h.265 encoding. This is the only option that shoots in h.265, making it the best (for file sizes at least). This is awesome because you can film in 4k and still end up with smaller bitrates than filming in HD.
The only reason not to select XAVC HS 4k is if you have a horrible computer that can’t handle editing h.265 files. In which case you should probably get a new computer (Seriously, M1 Macs are dramatically cheaper than this camera, or the lenses you bought for it).
If you can’t film in this format due to computer issues, Set your camera to film in XAVC S 4k (or HD if you’re concerned about file sizes).
2) Change the Frame Rate to 24p
Menu -> Shooting -> Image Quality -> Movie Settings -> Rec Frame Rate -> 24p
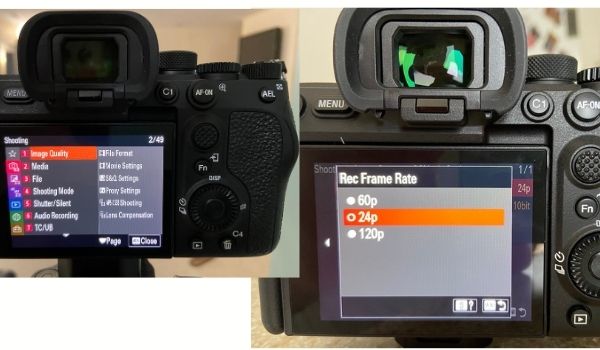
I record at 24 frames per second unless I’m doing slow motion (don’t worry, we’ll set up slow motion using the S&Q movie settings later).
3) Change The Bitrate
Menu -> Shooting -> Image Quality -> Movie Settings -> 50M 4:2:2 10bit
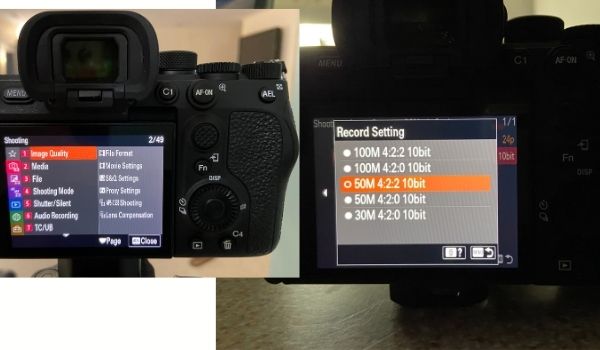
When I first looked at this, I was confused about why there was a 100M 4:2:2 10bit AND a 50M 4:2:2 10bit. Turns out, the former is All-I compression, and the latter is IPB compression.
All-i saves every frame of your video (which is why it’s a larger file size). IPB does some magic where it only saves the delta between one frame and another. I don’t see the difference, so I go with the smaller file sizes of IPB.
I prefer the 50M 4:2:2 because I color grade and sometimes do green screen work (See my post on shooting in log to understand 10bit color and my post on color sampling to understand the 4:2:2 part).
But, I think a valid case could be made to choose the 30M 4:2:0 10bit and cut your file sizes down by 40%. This would give you the smallest files the camera offers (which are still enormous files).
4) Change The S&Q Frame Rate
Shooting -> Image Quality -> S&Q Settings -> Rec Frame Rate -> 120p
Shooting -> Image Quality -> S&Q Settings -> Frame Rate -> 120fps
Shooting -> Image Quality -> S&Q Settings -> Record Setting -> 280M 4:2:2 10bit
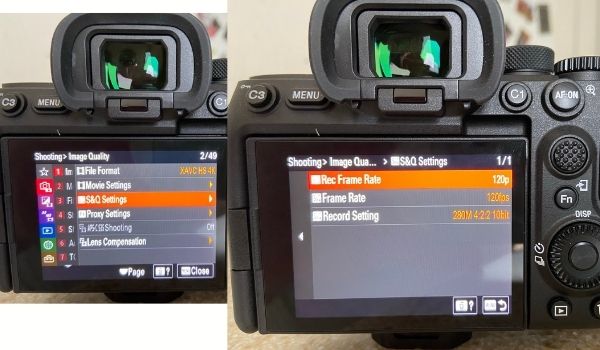
S&Q stands for “slow and quick motion.” Basically, if you turn your dial to S&Q, you’re filming in slow motion.
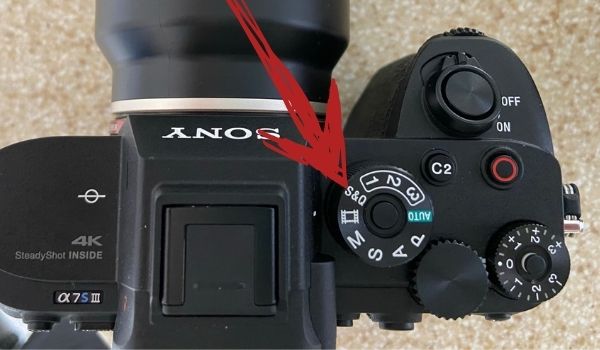
It’s handy to have this dial ready to go at a moment’s notice. I up everything to the max. I don’t film a ton of slow-motion content, but, I want to slow it down as much as possible when I do.
5) Change Media To Record to Both SD Cards
Menu -> Shooting -> Media -> Rec. Media Settings -> Recording Mode -> Simult. (Movie/Picture)
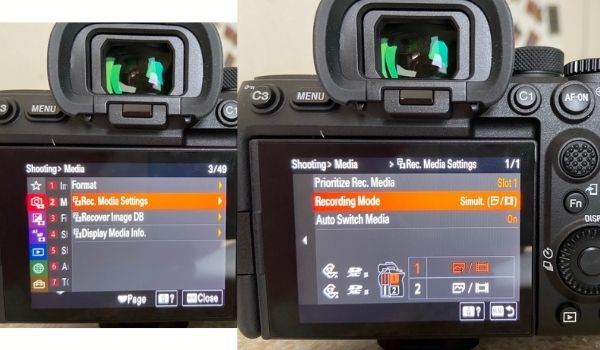
I’ve yet to lose any footage on my Sony due to a file getting corrupted. But, I’ve felt the pain of corrupted files on my past cameras, which feels devastating. Do yourself a favor and keep 2 SD cards in this thing at all times. Not having to ever go through that pain is well worth buying a 2nd SD card.
6) Change The Title Of Your Files
Menu -> Shooting -> File -> File Settings -> Title Name Settings -> Name of Next Project
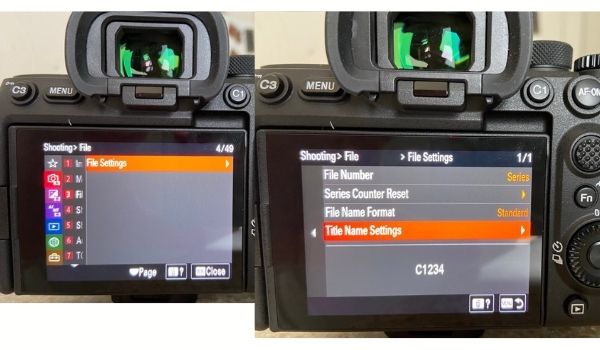
I’ve seen people set this to the name of their camera and the date. Personally, I set this to the project name I’m working on. Every time I film a new YouTube video I change the name. This really helps to stay organized when you’re editing later and don’t remember the difference between clip C1154 and C1253. If the clips instead say “A7S Settings 0001,” future-you will be very happy.
7) Use Manual Exposure Mode
Menu -> Shooting Mode -> Exposure Mode -> Manual Exposure
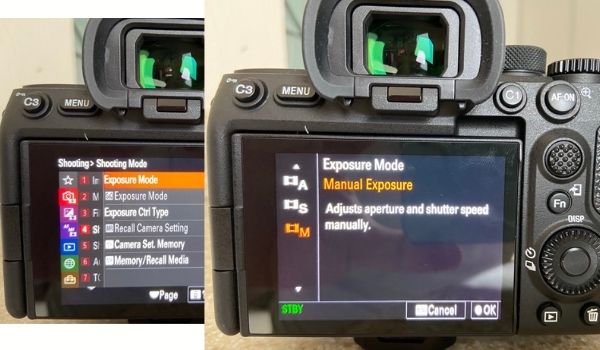
I dial in all my settings manually (white balance, ISO, aperture, etc.). If you don’t, you should probably skip any steps where I change things to manual.
Note: On the top of the camera, there’s an “exposure compensation dial“ that locks into place and has a bunch of numbers on it like 0, +1, -1, etc. That dial becomes completely worthless and does nothing if you shoot manually, so one less thing to learn.
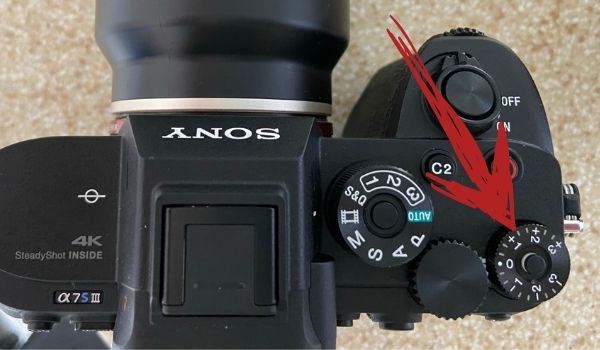
Second Note: You may want to turn your dial to S&Q and set the S&Q Exposure to match.
8) Emphasize Display During Record
Menu -> Shooting -> Shooting Display -> Emph disp dur REC -> On
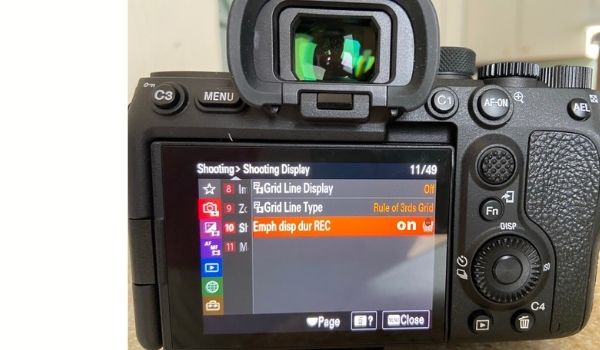
When you turn this feature on, it puts a big red box around your display when you’re recording. For me, it’s a nice visual indicator to remind myself if I’m actually filming when talking to the camera.
9) Set Your ISO Manually
Menu -> Exposure/Color -> Exposure -> ISO -> Whatever Value Makes Sense For The Shot
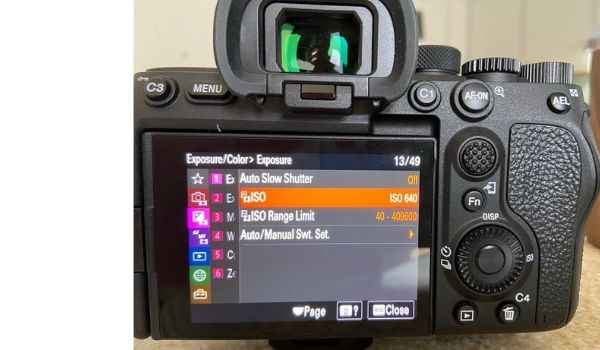
In a future step, we’ll add a shortcut to change this on the dials. For now, know that this is where you can set your ISO on the menu.
Also note, here are the base ISO’s for whatever camera you’re shooting in.
| Gamma | Base ISO | 2nd Native ISO (Always 20x Base) |
|---|---|---|
| PP Off | 80 | 1600 |
| Cine 1 | 60 | 1250 |
| Cine 2 | 50 | 1000 |
| Cine 3 | 80 | 1600 |
| Cine 4 | 100 | 2000 |
| HLG | 100 | 2000 |
| HLG 1 | 50 | 1000 |
| HLG 2 | 80 | 1600 |
| HLG 3 | 100 | 2000 |
| SLog2 | 640 | 12800 |
| SLog3 | 640 | 12800 |
I shoot in SLog3, which has a dual native ISO of 640 and 12,800 on the a7s iii.
In Layman’s terms, this means If your ISO starts to approach 12,800, consider moving it all the way to 12,800 to reduce noise. Also if your ISO’s down to 100 and is still too bright, consider reducing the light or buying an ND Filter.
If your ISO’s higher than 128,000+, Consider adding some lights to your scene so you can lower it back down closer to 12,800. Otherwise, the footage can get noisy.
10) Set Auto Slow Shutter to Off
Menu -> Exposure/Color -> Exposure -> Auto Slow Shutter -> Off
I think setting the exposure mode to manual turned this off earlier. But, in case it didn’t, I turn it off here. Your shutter speed should be ~2X your frame rate. So just dial that in manually one time (1/50 for 24fps video), and you’ll probably never change it again.
11) Set the White Balance Manually
Menu -> Exposure/Color -> White Balance -> C.Temp/Filter -> Whatever the color temperature of your light Source is.
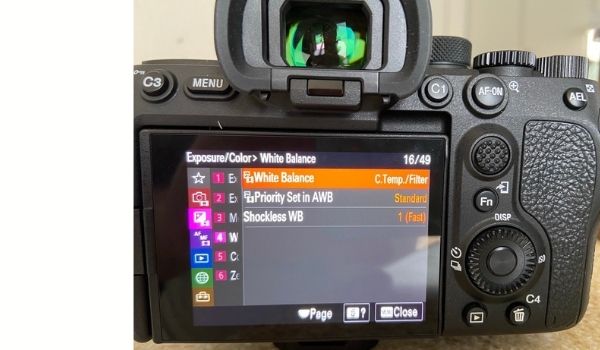
We’ll add the ability to change the white balance via the camera’s dials in a later step.
12) Play Around With Sony’s Creative Looks
Menu -> Exposure/Color -> Color/Tone -> Creative Look -> Choose Your Favorite
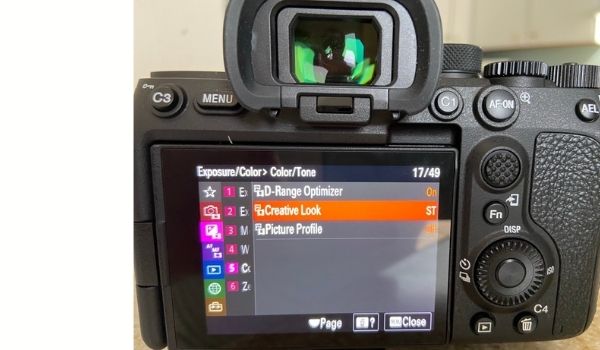
You can only use Sony’s “Creative Look” feature when picture profiles are turned off. I usually use a picture profile, so I don’t need to look at this. But, if you don’t want to film in SLog3 or do any color grading, this may be the place the be. You should definitely be aware the feature exists.
13) Set Up My SLog3 Picture Profile
Menu -> Exposure/Color -> Color/Tone -> Picture Profile -> PP8
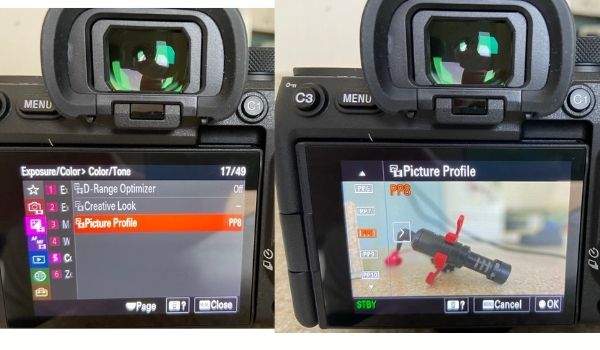
You can customize any picture profile to have any attributes that you want. But, I don’t like to alter the picture profiles too much in case other creators reference them (I’d have no clue what they were talking about if I changed them).
I like to shoot with a Gamma of SLog3 and a Color Mode of S-Gamut3.Cine. Luckily PP8 is pre-programmed with those values. So choose PP8. The only change I make to PP8 is moving the detail setting from -7 to -3. But, that’s optional.
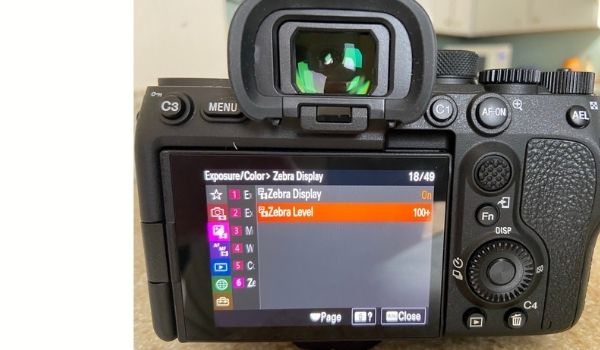
14) Set The Zebra Levels to 100+
Menu -> Exposure/Color -> Zebra Display -> Zebra Level
I get annoyed if the Zebras are popping up when I’m not yet clipping. It’d be like if you’re car dinged at you when you’re getting close to speeding. When you set this to 100+, you only see them on your viewfinder if you’re definitely messing up. Which is how I like it. I don’t care if I’m almost messing up.
15) Turn Off The A7s iii ViewFinder
Menu -> Setup -> Finder/Monitor -> Select Finder / Monitor -> Monitor(Manual)
This is personal preference (DSLR lovers are spinning in their graves right now). Some people really love looking into that little viewfinder (there’s an awesome viewfinder on this camera btw). That said, I pretty much exclusively use the flippy screen. It’s so annoying having the display turn off if anything gets in front of the viewfinder. So I just shut the whole thing down.
16) Set The Sleep Timer to 30 Minutes
Settings -> Setup -> Power Save Settings -> Power Save Start Time -> 30 Min
This will help drain your battery for sure. This thing can run through a battery within a couple hours if it never shuts off and you use all my other settings.
That said, I own multiple batteries. The thing can run while plugged into USB-C. To me, losing battery power is well worth not dealing with the annoyance of the camera going to sleep every single minute.
17) Customize Your “1,2, and 3” Dials
Menu -> Shooting -> Shooting Mode -> Camera Set Memory -> Clicking OK on the Number 1,2, or 3 Will Save Your Current Settings to the Mode Dial.
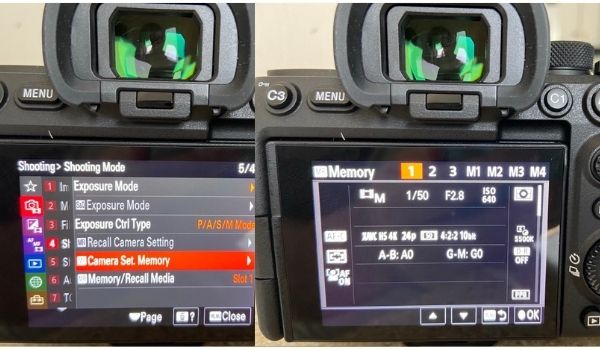
The “Mode Dial” (top dial with P,A,S,M, 1, 2, 3, etc. on it) on your camera will have 3 numbers on it. This setting will save the current settings of your camera as the default for that number.
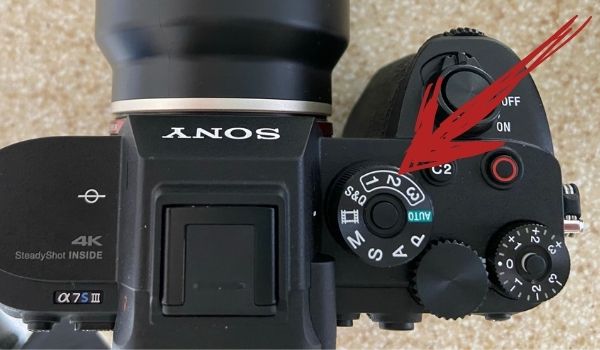
I won’t tell you how to set up each number. Just that this feature will save your current settings to the dial number, which is pretty awesome.
18) Turn On Peaking Display, Change the Color
Menu -> Focus -> Peaking Display -> Peaking Display -> On
Menu -> Focus -> Peaking Display -> Peaking Color -> Red
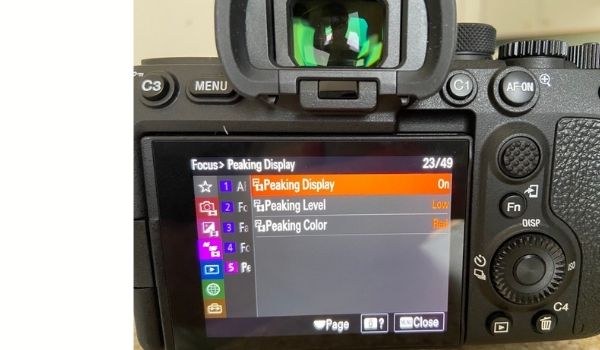
Peaking display is a visual indicator of what’s in focus when using manual focus. The color is just how your viewfinder communicates to you what’s in focus. This is helpful if you ever need to switch to manual focus. If not, you’ll never use it.
19) Increase Your Monitor Brightness
Menu -> Setup -> Finder/Monitor -> Monitor Brightness -> Sunny Weather
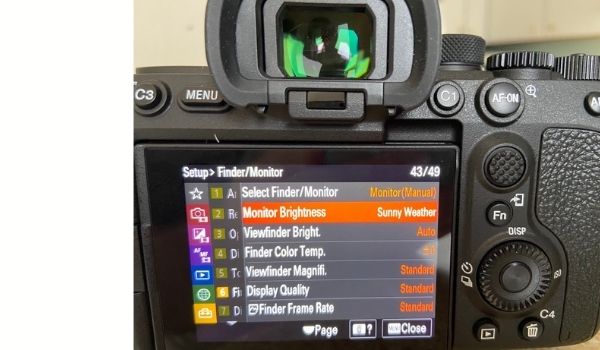
This makes your monitor brighter. There’s a slight cost to battery life, but again, worth it. (Buy a 2nd battery).
20) Turn On Gamma Display Assist
Menu -> Setup -> Display Option -> Gamma Display Assist -> On
Menu -> Setup -> Display Option -> Gamma Disp Assist Type -> S-Log3->709(800%)
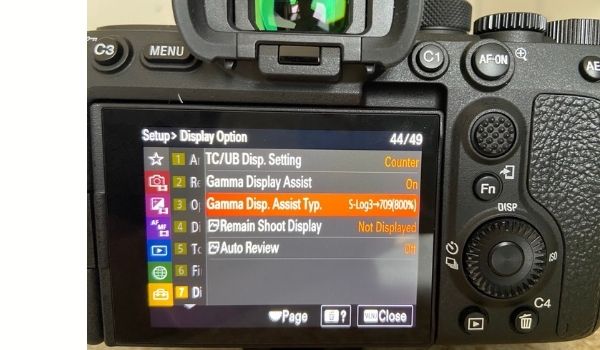
When you film in Log, all your footage looks very milky and neutral without a ton of contrast. This setting acts as a LUT, so the footage in your viewfinder has some color again. A big battery drainer, but also a neat feature.
21) Customize Your Camera’s Dials
This is the camera’s best settings feature, and by-far the most confusing one to set up. So hold tight.
OK, now that you’re shooting manually it is absolutely crucial that you can easily change your ISO, Audio Levels, White Balance, aperture, and Shutter Speed (in that order). By default, your “Front Dial” will quickly change your aperture, and your “Rear Dial” will quickly change your Shutter Speed.
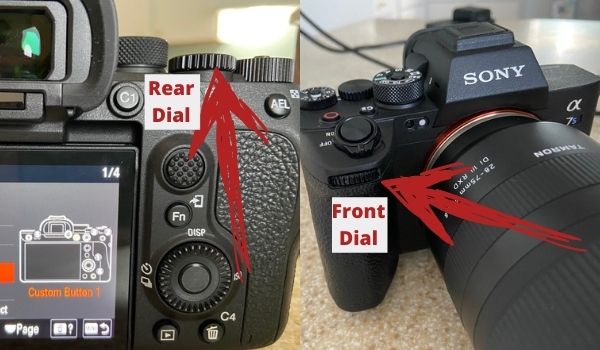
OK Great, now we just have to figure out how to quickly get the same dial control for ISO, Audio Levels, and White Balance. To do that, we’re going to alter the C1 button to toggle what the individual dials do.
Setup -> Operation Customize -> Picture Custom Key Setting -> Rear 1 -> 4 -> (Find ”Toggle my Dial 1” under Settings -> Dial Customize -> Toggle My Dial 1)
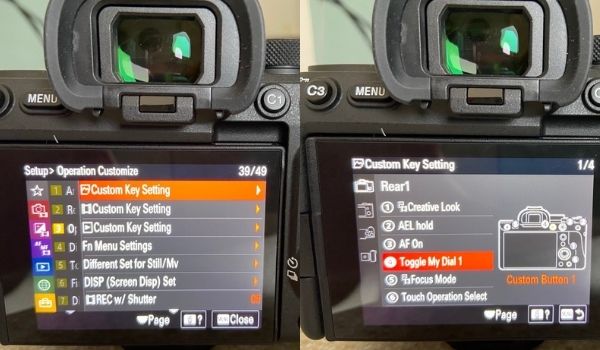
Holy crap, Sony made that harder than it should be. Hopefully you’re still with me.
When you click “Toggle My Dial 1” it’ll give you the ability to select what the front dial, rear dial, and control wheel will do. I set the front dial to “Audio Rec Level,” the rear dial to ”ISO,” and the control wheel to “W Balance (C Temp).”
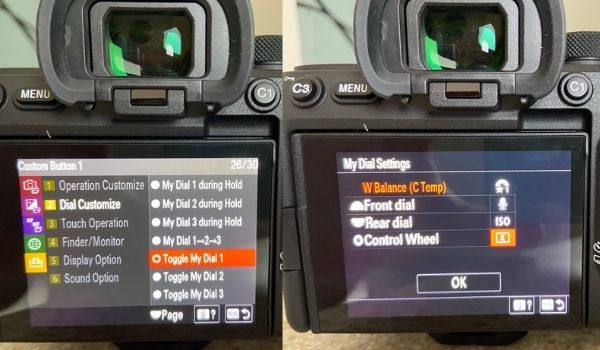
When I press C1, I can easily dial in my ISO, Audio levels, and color temperature. If I press C1 again, I can change my shutter speed and aperture via the dials. Incredible! This was precisely what I wanted!
OK, one more setting here to change. By default, your “Control Wheel” doesn’t do anything. I set it to change your Creative Looks (which will only work if your Picture Profile is turned off). It’s a pretty easy/fun way to change the look of what you’re shooting with no picture profile (and it’s how I’d shoot if I weren’t using SLog3).
Setup -> Operation Customize -> Picture Custom Key Setting -> Rear 1 -> 1(Control wheel) -> Creative Look
That was hard to figure out, but how amazing is your camera now?! Great job!
22) Download My Settings (Or Save Yours So You Have a Backup)
Menu -> Setup -> Reset/Save Settings -> Save/Load Settings -> Save/Load
Sony has a cool feature where you can save your settings to a file and load them back up later. You can download mine here, although I think it’s better if you go through this list one by one to figure out what your camera does.


