When I was a developer I sometimes had clients that wanted to generate reports but weren’t allowed to use any backend libraries as solutions. Their only option was to use pure JavaScript to generate reports in Excel.
And while that’s not easy to do, it is definitely possible following my instructions below!
Ask Yourself if a CSV File is Good Enough
Don’t worry, I will teach you to to create an actual excel file with pure JavaScript below.
But first, I need you to understand that a CSV (comma separated value) file with no formatting applied is 100x easier to create with JavaScript than an excel file is. So if you don’t need the formatting options that an xlsx file provides, please consider creating a CSV file instead. It will make everyone’s life significantly easier.
And that’s because generating a CSV file is relatively simple. The code below can take a 2D JavaScript array and produce a CSV file in a modern web browser (eg. not IE 7). Simply pass it 2d arrays and you’ll have CSV files popping out the other end.
<!DOCTYPE html>
<html lang="en">
<head>
    <meta charset="UTF-8">
    <title>CSV Export</title>
</head>
<body>
<button id="generateReportButton" onclick='generateFile();'>Generate Report</button>


<script>

function generateFile(){
	exportToCsv("MyFileName.csv",[[1,2],[3,4],[5,6]]);
}


function exportToCsv(filename, rows) {

  var processRow = function (row) {
    var finalVal = '';
    for (var j = 0; j < row.length; j++) {
      var innerValue = '';
      if(row[j] === 0){
        innerValue = row[j].toString();
      }
      if(row[j]){
        innerValue = row[j].toString();
      }
      if (row[j] instanceof Date) {
        innerValue = row[j].toLocaleString();
      };
      var result = innerValue.replace(/"/g, '""');
      if (result.search(/("|,|\n)/g) >= 0)
        result = '"' + result + '"';
      if (j > 0)
        finalVal += ',';
      finalVal += result;
    }
    return finalVal + '\n';
  };

  var csvFile = '';
  for (var i = 0; i < rows.length; i++) {
		csvFile += processRow(rows[i]);
  }

  var blob = new Blob([csvFile], { type: 'text/csv;charset=utf-8;' });
  if (navigator.msSaveBlob) { // IE 10+
    navigator.msSaveBlob(blob, filename);
  } else {
    var link = document.createElement("a");
    if (link.download !== undefined) { // feature detection
      // Browsers that support HTML5 download attribute
      var url = URL.createObjectURL(blob);
      link.setAttribute("href", url);
      link.setAttribute("download", filename);
      link.style.visibility = 'hidden';
      document.body.appendChild(link);
      link.click();
      document.body.removeChild(link);
    }
  }

  }


</script>

</body>
</html>
You can likely shorten the exportToCsv method like in this StackOverflow post. Mine is a little longer because I wanted to make special cases for things like dates or random quotes in the array values. Either will work without too much issue though.
How Creating an Excel File in Pure JavaScript Works
This is the fun part. How the heck do we create an actual XLSX file with pure JavaScript?
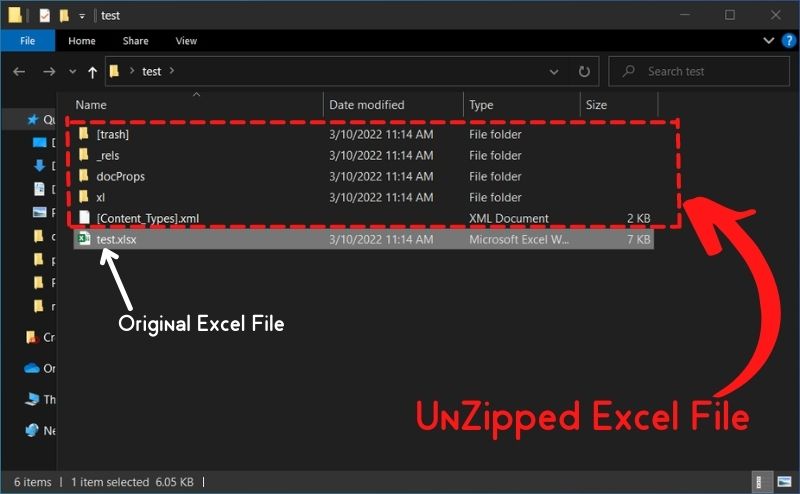
If you research Excel files, you’ll find that they’re just a bunch of XML files zipped together (using the SpreadsheetML specification). In fact, I recommend you take an excel file and unzip it with something like 7-zip to see its inner contents right now.

JavaScript is capable of zipping up files. And JavaScript is capable of creating XML files via strings. So to create an XLSX file with JavaScript all we have to do is reverse the unzipping of your Excel file and we did it! How hard can that be?
Well… Actually it’s really hard. But breathe easy because I’m here to help walk you through it. Let’s start with the easiest step of zipping up files with JavaScript.
Zipping Up Files With JavaScript
When I said we could create excel files with pure JavaScript, hopefully you didn’t take that to mean we could do this without any JavaScript libraries. Don’t get me wrong. You could write your own JavaScript zip utility and file saver utility to do this (it’s all open source so you can see how they did it). The problem is it’s complicated, time consuming, and beyond the scope of this blog post.
So we’re just going to leverage two utilities. The awesome JSZIP library to zip our files and FileSaver.js library to save the files. No need to download them for this demo as I’ll just use CDNJS’s CDN to grab the files in the code below.
Actually let’s demo creating a couple small files and saving them out now just so you can see how that part of the process works.
<!DOCTYPE html>
<html lang="en">
<head>
    <meta charset="UTF-8">
    <title>JavaScript Wtih Excel</title>

    <script src="https://cdnjs.cloudflare.com/ajax/libs/jszip/3.9.1/jszip.min.js"></script>
    <script src="https://cdnjs.cloudflare.com/ajax/libs/FileSaver.js/2.0.0/FileSaver.min.js"></script>
</head>
<body>
<button id="generateReportButton" onclick="generateFiles();">Generate Report</button>

<script>

  function generateFiles(){

	var zip = new JSZip();
	//create a file
	zip.file("Hello.txt", "Hello World\n");

	//create a folder
	var myfolder = zip.folder("myFolder");
	//put a file in the folder
	myfolder.file("World.txt", "Hello World\n");

	//save out the zip file
	zip.generateAsync({type:"blob"})
		.then(function(content) {
			// see FileSaver.js
			saveAs(content, "example.zip");
		});
  }

</script>

</body>
</html>
You can hopefully see where we’re going with this now. All we have to do is figure out the minimum amount of SpreadSheetML needed to create an excel file and then zip that SpreadsheetML up using the utilities above.
Creating a “Hello World” SpreadSheet Using JavaScript
While I’ve made this sound easy so far, it’s not.
The part that makes it hard is that the SpreadSheetML needed for a basic XLSX file is effectively spaghetti code and incredibly hard to work with. And as far as I know there’s no good JavaScript utility out there to generate it.
That said, Let’s get right to the final solution that will generate Excel files for you and then I’ll explain how it all works. Simply copy and paste the code below into an HTML file, run it, and you’ll get a full Excel file out the other end.
<!DOCTYPE html>
<html lang="en">
<head>
    <meta charset="UTF-8">
    <title>JavaScript Wtih Excel</title>

    <script src="https://cdnjs.cloudflare.com/ajax/libs/jszip/3.9.1/jszip.min.js"></script>
    <script src="https://cdnjs.cloudflare.com/ajax/libs/FileSaver.js/2.0.0/FileSaver.min.js"></script>
</head>
<body>
<button id="generateReportButton" onclick="generateFiles();">Generate Report</button>

<script>

  function generateFiles(){

   var zip = new JSZip();

      zip.file("[Content_Types].xml", '<?xml version="1.0" encoding="UTF-8" standalone="yes"?>\n' +
          '<Types xmlns="http://schemas.openxmlformats.org/package/2006/content-types"><Default Extension="rels" ContentType="application/vnd.openxmlformats-package.relationships+xml"/><Default Extension="xml" ContentType="application/xml"/><Override PartName="/xl/workbook.xml" ContentType="application/vnd.openxmlformats-officedocument.spreadsheetml.sheet.main+xml"/><Override PartName="/xl/worksheets/sheet1.xml" ContentType="application/vnd.openxmlformats-officedocument.spreadsheetml.worksheet+xml"/><Override PartName="/xl/theme/theme1.xml" ContentType="application/vnd.openxmlformats-officedocument.theme+xml"/><Override PartName="/xl/styles.xml" ContentType="application/vnd.openxmlformats-officedocument.spreadsheetml.styles+xml"/><Override PartName="/docProps/core.xml" ContentType="application/vnd.openxmlformats-package.core-properties+xml"/><Override PartName="/docProps/app.xml" ContentType="application/vnd.openxmlformats-officedocument.extended-properties+xml"/></Types>');

      var rels = zip.folder("_rels");
      rels.file(".rels",'<?xml version="1.0" encoding="UTF-8" standalone="yes"?>\n' +
          '<Relationships xmlns="http://schemas.openxmlformats.org/package/2006/relationships"><Relationship Id="rId3" Type="http://purl.oclc.org/ooxml/officeDocument/relationships/extendedProperties" Target="docProps/app.xml"/><Relationship Id="rId2" Type="http://schemas.openxmlformats.org/package/2006/relationships/metadata/core-properties" Target="docProps/core.xml"/><Relationship Id="rId1" Type="http://purl.oclc.org/ooxml/officeDocument/relationships/officeDocument" Target="xl/workbook.xml"/></Relationships>')


      var xl = zip.folder("xl");

      var xl_rels = xl.folder("_rels");
      xl_rels.file("workbook.xml.rels",'<?xml version="1.0" encoding="UTF-8" standalone="yes"?>\n' +
          '<Relationships xmlns="http://schemas.openxmlformats.org/package/2006/relationships"><Relationship Id="rId3" Type="http://purl.oclc.org/ooxml/officeDocument/relationships/styles" Target="styles.xml"/><Relationship Id="rId2" Type="http://purl.oclc.org/ooxml/officeDocument/relationships/theme" Target="theme/theme1.xml"/><Relationship Id="rId1" Type="http://purl.oclc.org/ooxml/officeDocument/relationships/worksheet" Target="worksheets/sheet1.xml"/></Relationships>');

      xl.file("styles.xml",'<?xml version="1.0" encoding="UTF-8" standalone="yes"?>\n' +
          '<styleSheet xmlns="http://purl.oclc.org/ooxml/spreadsheetml/main" xmlns:mc="http://schemas.openxmlformats.org/markup-compatibility/2006" mc:Ignorable="x14ac x16r2 xr" xmlns:x14ac="http://schemas.microsoft.com/office/spreadsheetml/2009/9/ac" xmlns:x16r2="http://schemas.microsoft.com/office/spreadsheetml/2015/02/main" xmlns:xr="http://schemas.microsoft.com/office/spreadsheetml/2014/revision">' +
          '<fonts count="1"><font /></fonts>' +
          '<fills count="1"><fill /></fills>' +
          '<borders count="1"><border /></borders>' +
          '<cellStyleXfs count="1"><xf /></cellStyleXfs>' +
          '<cellXfs count="1"><xf /></cellXfs>' +
          '</styleSheet>');
      xl.file("workbook.xml",'<?xml version="1.0" encoding="UTF-8" standalone="yes"?>\n' +
          '<workbook xmlns="http://purl.oclc.org/ooxml/spreadsheetml/main" xmlns:r="http://purl.oclc.org/ooxml/officeDocument/relationships" xmlns:mc="http://schemas.openxmlformats.org/markup-compatibility/2006" mc:Ignorable="x15 xr xr6 xr10 xr2" xmlns:x15="http://schemas.microsoft.com/office/spreadsheetml/2010/11/main" xmlns:xr="http://schemas.microsoft.com/office/spreadsheetml/2014/revision" xmlns:xr6="http://schemas.microsoft.com/office/spreadsheetml/2016/revision6" xmlns:xr10="http://schemas.microsoft.com/office/spreadsheetml/2016/revision10" xmlns:xr2="http://schemas.microsoft.com/office/spreadsheetml/2015/revision2" conformance="strict"><fileVersion appName="xl" lastEdited="7" lowestEdited="7" rupBuild="23801"/><workbookPr dateCompatibility="0" defaultThemeVersion="166925"/><mc:AlternateContent xmlns:mc="http://schemas.openxmlformats.org/markup-compatibility/2006"><mc:Choice Requires="x15"><x15ac:absPath url="C:\\Users\\534223\\Desktop\\carlos project\\" xmlns:x15ac="http://schemas.microsoft.com/office/spreadsheetml/2010/11/ac"/></mc:Choice></mc:AlternateContent><xr:revisionPtr revIDLastSave="0" documentId="8_{3A289708-EEB4-4C61-80F8-0077D98C4C49}" xr6:coauthVersionLast="46" xr6:coauthVersionMax="46" xr10:uidLastSave="{00000000-0000-0000-0000-000000000000}"/><bookViews><workbookView xWindow="-108" yWindow="-108" windowWidth="23256" windowHeight="12576" xr2:uid="{7AE87E27-093C-4FCA-9244-038BA05B474C}"/></bookViews><sheets><sheet name="180 Days" sheetId="1" r:id="rId1"/></sheets><calcPr calcId="191029"/><extLst><ext uri="{79F54976-1DA5-4618-B147-4CDE4B953A38}" xmlns:x14="http://schemas.microsoft.com/office/spreadsheetml/2009/9/main"><x14:workbookPr/></ext><ext uri="{140A7094-0E35-4892-8432-C4D2E57EDEB5}" xmlns:x15="http://schemas.microsoft.com/office/spreadsheetml/2010/11/main"><x15:workbookPr chartTrackingRefBase="1"/></ext><ext uri="{B58B0392-4F1F-4190-BB64-5DF3571DCE5F}" xmlns:xcalcf="http://schemas.microsoft.com/office/spreadsheetml/2018/calcfeatures"><xcalcf:calcFeatures><xcalcf:feature name="microsoft.com:RD"/><xcalcf:feature name="microsoft.com:Single"/><xcalcf:feature name="microsoft.com:FV"/><xcalcf:feature name="microsoft.com:CNMTM"/><xcalcf:feature name="microsoft.com:LET_WF"/></xcalcf:calcFeatures></ext></extLst></workbook>');

      var worksheets = xl.folder("worksheets");
      worksheets.file("sheet1.xml", '<?xml version="1.0" encoding="UTF-8" standalone="yes"?><worksheet xmlns="http://purl.oclc.org/ooxml/spreadsheetml/main" xmlns:r="http://purl.oclc.org/ooxml/officeDocument/relationships" xmlns:v="urn:schemas-microsoft-com:vml" xmlns:mc="http://schemas.openxmlformats.org/markup-compatibility/2006" mc:Ignorable="x14ac xr xr2 xr3" xmlns:x14ac="http://schemas.microsoft.com/office/spreadsheetml/2009/9/ac" xmlns:xr="http://schemas.microsoft.com/office/spreadsheetml/2014/revision" xmlns:xr2="http://schemas.microsoft.com/office/spreadsheetml/2015/revision2" xmlns:xr3="http://schemas.microsoft.com/office/spreadsheetml/2016/revision3" xr:uid="{7692402F-0706-4FB4-BC3D-F5CCF87FAADF}"><dimension ref="A1"/><sheetViews><sheetView tabSelected="1" workbookViewId="0"/></sheetViews><sheetFormatPr defaultRowHeight="14.4" x14ac:dyDescent="0.3"/><sheetData><row><c t="inlineStr"><is><t>Hello</t></is></c><c t="inlineStr"><is><t>World</t></is></c></row></sheetData><pageMargins left="0.7" right="0.7" top="0.75" bottom="0.75" header="0.3" footer="0.3"/></worksheet>');

      zip.generateAsync({type:"blob"}).then(function(content) {
          // see FileSaver.js
          saveAs(content, "Excel_File.xlsx");
      });

  }

</script>

</body>
</html>
You did it! You created an Excel file with pure JavaScript! Congratulations! Now how does it work?
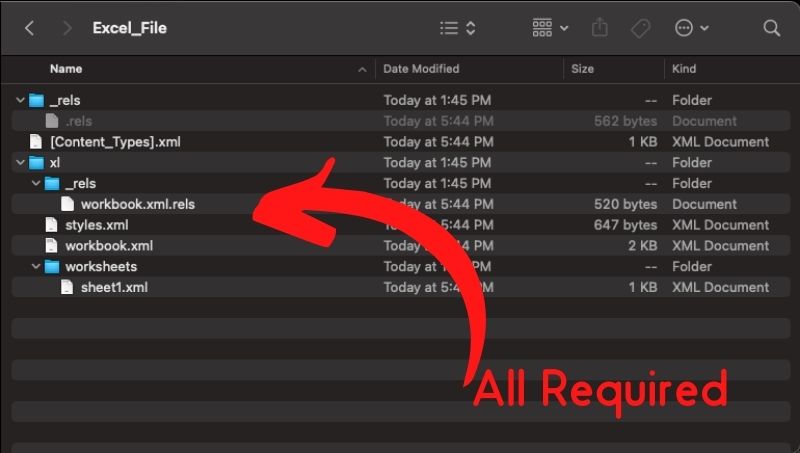
Well first take note of the minimum number of folders and files I used to make it work. There might be ways to reduce it down further if you study the SpreadsheetML specification, but I was only able to get it down to about 3 folders and 5 files. The structure looks like this.

The directories I needed were as follows. They’re not too exciting you just need to create them.
- _rels
- xl
- xl->_rels
- xl->worksheets
And the files I needed were as follows.
- [Content_Types].xml – File is needed to store metadata. It basically says where all the required files are located. If you wanted to try to build this with fewer directories I’d start by modifying this file.
- _rels->.rels – File is needed to store metadata.
- xl->_rels->workbook.xml.rels – More boring metadata that I couldn’t get it to work without.
- xl->styles.xml – Contains styles to apply to your worksheet. I’d actually prefer to remove this document and do styles inline if I could (I don’t think you can) because trying to use this is a complete mess.
- xl->workbook.xml – Contains your workbook. I created a very basic one that basically points to your worksheets.
- xl->worksheets->sheet1.xml – I created a basic worksheet that has a few simple values in the cells. This is where you’re going to do the main work of entering data into your spreadsheet and is really the meat of the whole thing.
I’d post the code for each file but it’s all in the JavaScript you copied earlier. Or, a better way to see it is to unzip the excel file this JavaScript generates and check it out for yourself.
Would I recommend creating excel files in pure JavaScript? No. But, I’ve worked in environments where it would be a super cool feature to have and JavaScript is the only way to produce the file. In a pinch the juice might be worth the squeeze. Let me know what you think in the comments!


